- COVID-19 Information for our customers. Learn more

DIY Repair Tips for Your GE Range
June 4, 2019
Your GE electric oven won’t turn on?
December 19, 2019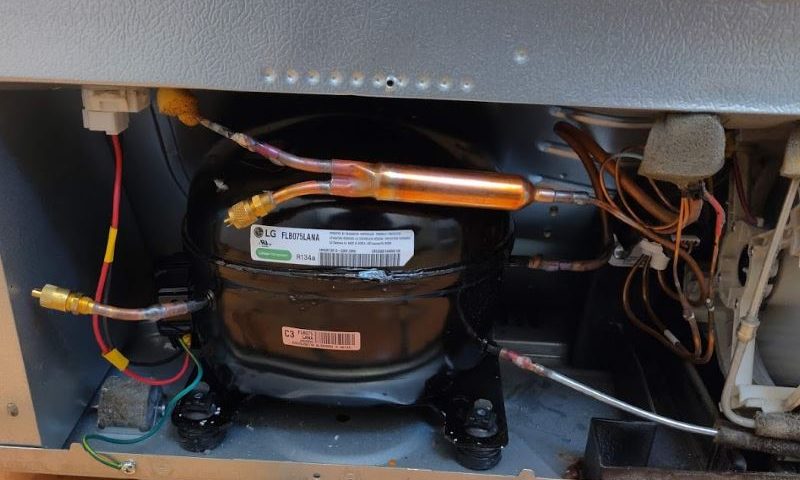
[vc_row][vc_column][vc_column_text]
A Step-by-Step Guide to Replacing Your LG Compressor
[/vc_column_text][/vc_column][/vc_row][vc_row][vc_column width=”1/2″][vc_column_text]It does not happen every day that you have to replace your refrigerator compressor and compressor replacement could be a challenging task even for people with practical technical skills. This simple step-by-step guide to replacing your LG/Kenmore’s refrigerator compressor will help you select the right tools and eventually complete the replacement job yourself![/vc_column_text][vc_column_text]Make sure that you have all the necessary equipment. At the very least, you will need:
- New compressor. Make sure to use the same model or at least a manufacturer-approved replacement.
- Refrigerant. In this job we use Forane 134a, however, your refrigerator might be using a different refrigerant. You can find a tag with the refrigerant name either inside or at the back of your refrigerator.
- 2-valve manifold refrigeration pressure gauge
- Vacuum pump
- Refrigerant scale
- Brazing equipment, solder rods, flux
[/vc_column_text][/vc_column][vc_column width=”1/2″][vc_single_image image=”507″ img_size=”full”][/vc_column][/vc_row][vc_row][vc_column width=”2/3″][vc_column_text]
Step 1. Preparation
In LG/Kenmore refrigerators, the compressor is located at the bottom part of the back of the refrigerator. You will need access to the back of the fridge so you might have to pull your refrigerator from the wall or counter.
At this point, we have already determined that we have a faulty compressor that requires replacement. What we need to do is to prepare the space for a new compressor. Evacuate the refrigerant out of the system, remove the clips at the bottom side of the compressor and cut the piping.[/vc_column_text][/vc_column][vc_column width=”1/3″][vc_single_image image=”508″ img_size=”full”][/vc_column][/vc_row][vc_row][vc_column width=”2/3″][vc_column_text]
Step 2. Remove the Faulty Compressor
You will have to remove or replace the filter dryer in order to be able to pull off the compressor as well. Carefully remove the compressor without kicking any of the tubings. Make sure the connectors are sanded down – brazing is a delicate job and it may be difficult to correct it.
Step 3. Insert the New Compressor and Braze the Joints
Insert the compressor and the filter dryer, make sure that the joints are connecting snuggly before you start blazing. We use a silver solder rod for copper joints and a tin rod coated with flux for a higher steel grade joint, so it does a better job. You can finish the blazing in one go using two different rods.
After you are done, double check the joints and make sure everything is tight, and you can start vacuuming.
Step 4. Vacuum the Compressor
It’s necessary to vacuum the sealed system in order to remove moisture and atmosphere from it before filling it with the refrigerant. Hook up the high and low sides to your manifold gauge and connect the middle tube to the vacuum pump.
You may want to let the vacuum pump running for about 30 minutes until the pressure reaches 30 inches of Mercury – the closest to absolute zero we can get![/vc_column_text][/vc_column][vc_column width=”1/3″][vc_single_image image=”512″ img_size=”full”][/vc_column][/vc_row][vc_row][vc_column width=”2/3″][vc_column_text]
Step 5. Charge It With Refrigerant
You will require refrigerant scales in order to monitor the amount of gas that is to be pumped in the system and the refrigerant cylinder. Here we use 134a, however, your refrigerator may be using another gas. According to the tag inside this refrigerator requires 4.76 ounces of refrigerant. We would normally add around a quarter extra since some of the refrigerant will be released whenever you connect or disconnect the line.[/vc_column_text][/vc_column][vc_column width=”1/3″][vc_single_image image=”513″ img_size=”full”][/vc_column][/vc_row][vc_row][vc_column width=”2/3″][vc_column_text]
Step 6. Start the Refrigerator
Start the refrigerator – normally it may take a minute or two until the compressor starts working as well.
It is important to monitor the change in pressure as the compressor gets going – at this point you may want to remove the high side and measure the charge on the low side. The low side gauge is more sensitive to the amount of refrigerant, and there will be too much overrelease due to the high side pressure. The pressure will slowly start falling. Because it is a variable speed linear compressor, it takes 10-15 minutes to run up to the full speed.
Monitor for a little bit and clean up in the meantime! Your refrigerator should start cooling in 4-5 hours.[/vc_column_text][/vc_column][vc_column width=”1/3″][vc_single_image image=”509″ img_size=”full”][/vc_column][/vc_row][vc_row][vc_column][vc_column_text][cp_popup display=”inline” style_id=”430″ step_id = “1”][/cp_popup][/vc_column_text][/vc_column][/vc_row]
